Growing mushrooms is a blast for a fun guy like me! What do you mean, that old chestnut? When it comes to mushroom puns, the world’s your oyster. Mushrooms are great for breakfast – in fact, they’re the breakfast of champignons. They really are the good shiitake! (Sorry, that one was in spore taste.) They’re all delicious, that’s the morel of the story!
Dad jokes aside, mushrooms are a great way to get the little ones involved and interested because they grow very fast – as quick as two weeks from preparing in fact! You can grow many of them indoors, but many species will also turn old logs and stumps into an edible feast. Fungi, after all, are nature’s recyclers.
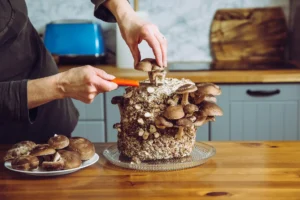
Mushroom growing kits offer a variety of different types of mushrooms for you to grow at home. We’re using an oyster mushroom kit, which we’re going to grow in a two-gallon pot stuffed with straw, and a ready-to-go kit that uses coffee grounds as its growing medium.
Growing Mushrooms on Straw
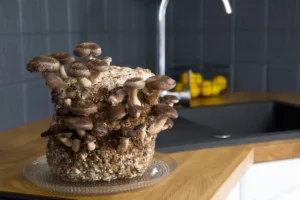
Our oyster mushroom kit requires a large pot of around 10 litres (2.5 US gallons), or you could use two pots of half this volume each. The growing medium is straw, pressed into pellets and ready to be rehydrated. In most kits the mushroom spawn (or mushroom ‘seeds’) is inoculated into grains such as barley.
CLICK HERE TO BUY EDIBLE MUSHROOM IN THE UK
Clean the pot then sterilise with a dilute household bleach solution. Cover the drainage holes with a circle of cardboard cut to fit the base of the pot. Punch or cut three evenly-spaced holes of around a half inch (1.5cm) in diameter into the sides.
Empty the straw pellets into the pot then break up the packet of grain kernels and add it to the straw pellets. Mix well to evenly distribute the spawn. Make sure to use very clean hands for this so you don’t introduce any unwanted germs. It’s usually best to do this outside to avoid making a mess.
Very slowly trickle half a gallon of water over the spawn mix. Allow the water to become fully absorbed – which will probably take around around half an hour – then add the same volume again, slowly. Once the straw pellets have fully rehydrated to fill the pot, push back the straw from your three holes to leave a cavity. This will help keep this area moist and protected, so the mushrooms can properly develop.
Next you need to make a lid to prevent everything from drying out. A simple way to make one is to cut out a round of stiff cardboard to fit, then wrap this in clear food wrap or clingfilm.
Growing Mushrooms Indoors
Now the growing medium is prepared, we just need to offer warm conditions for the mycelium (or mushroom ‘roots’) to grow. Room temperature is ideal, but keep the pot away from direct sources of heat. If you’re growing during the summer you could keep the pot outdoors, somewhere sheltered and out of direct sunlight.
Mist-spray the holes in your pot a couple of times a day. This will prevent the straw from getting too dry and provide the moist environment that mushrooms need.
After about five days you should see that the grain kernels have already started to sprout white mycelium. After two weeks the straw should be totally white with mycelium. At this stage your kit is ready to produce its first flush of mushrooms!
BUY PSYCHEDELIC MUSHROOM CHOCOLATE BARS IN THE UK
Continue to mist the holes twice daily, and within a week or two you should notice small clusters of primordia (the beginnings of your mushrooms). At this stage misting becomes even more important as these mustn’t be allowed to dry out. They’ll swell into full-sized mushrooms within about a week of spotting the primordia.
The best time to harvest oyster mushrooms is before the caps have fully flattened out, otherwise they will dump lots of spores everywhere! Twist free the whole cluster at once – the mushrooms will be different sizes and that’s fine – and trim any stump out with a sharp knife, right back to fresh straw. Continue misting, and you can expect new mushrooms to sprout from the harvested hole in due course. They should keep cropping every few weeks for up to around 10 weeks.
Coffee Grounds Mushroom Kit
![]()
I hate waste, and my daily cup of joe creates quite a bit of it in the form of coffee grounds. But what if you could turn this waste into food? That’s what the coffee grounds mushroom kit does, using coffee grounds mixed with a little straw to create the ideal growing medium for our mushrooms.
Simply cut open front of box and cut a cross into the front of the bag. Soak the bag overnight, let it drain off, then pop back into the box. Mist the cut-open front of the box with water twice a day. Keep the kit on a windowsill or work surface out of direct sunlight, avoiding direct sources of heat.
About seven days after starting your kit off, you should see the beginnings of primordia. These grow very quickly, doubling in size almost every day! Within a week, it’s harvest time. Again, harvest the mushrooms when the caps have just started to open out but haven’t yet flattened. Flattened out mushrooms don’t store for long, and aren’t quite as firm and flavoursome. To harvest, simply twist and pull them away with your hands.
You grow a follow-on flush of mushrooms using this kit too. Allow the kit to rest for two days following harvest, then soak the block in water just as you did when you started it off. Weigh it down if necessary. Lift it out, allow the excess moisture to drain off, then pop it back into the box. As before, mist regularly. The second crop should follow on within a couple of weeks. And once you’ve had that harvest, repeat the process once more!
Quality mushrooms can be pricey, but by growing your own you can be sure of perfect ‘shrooms at peak freshness – and for a lot less than at the grocery store! They’re so powerfully good for you too: great for the immune system and for fighting off diseases. Have you grown mushrooms before, and what’s your favourite variety? Join in the conversation below! Have fun guys
BONUS
How to grow mushrooms

Image: Windowsill Mushroom Growing Kit from Thompson & Morgan
For something a bit different, why not grow your own mushrooms at home? Not as complicated as you might think, our complete mushroom growing kits provide step-by-step instructions along with everything you need. Here’s a quick guide to growing your own mushrooms using logs or easy-grow kits.
Why you should grow your own mushrooms
Image: Mushroom ‘White Cap Button’ from Thompson & Morgan
Mushrooms are virtually fat and calorie-free and are packed full of vitamins and minerals to keep you feeling on top form. They’re also a very rich source of protein and therefore perfect for vegans and vegetarians.
Although mushrooms do grow in the wild, it’s much safer to grow your own than risk foraging. You’ll know exactly which varieties you’re eating and you can enjoy watching the process as they fruit.
Best types of mushrooms to grow at home
- Oyster mushrooms (Pleurotus ostreatus) – With a thick, soft texture and a subtle flavour, these mushrooms can be eaten raw or cooked and are often used in Oriental dishes.
- Shiitake mushrooms (Lentinula edodes) – Cultivated and nurtured in Japan for more than a thousand years, Shiitake mushrooms are a sought-after ingredient for many Oriental dishes. A good accompaniment to meats, stir-fries and heavy sauces.
- Lions’ Mane (Hericium erinaceus) – Grown in China and Japan for hundreds of years, these mushrooms are renowned for their medicinal benefits. This unusual variety has a taste likened to lobster when cooked with butter, but can be eaten boiled, grilled or as a healthy addition to many other dishes.
- Brown Cap or Portabella mushrooms(Agaricus bisporus) – A traditional variety with a firm texture and enhanced nutty flavour.
- White Cap mushrooms (Agaricus bisporus) – the most commonly available mushroom, this variety also contains some of the highest levels of vitamins and minerals.
How to grow mushrooms on logs
One of the simplest ways to grow mushrooms is on logs. Wooden dowels, impregnated with mushroom mycelium (mushroom spawn), are inserted into hardwood logs where they produce crops of fruit several times a year for about five years or so.
Although dowels are available all year, the logs needed to grow the mushrooms should be cut from healthy trees during the dormant season (between leaf fall in autumn and early spring). Store your dowels in the fridge or a cool, dark, well-ventilated place until ready to use, and plant them in the log no longer than 6 weeks after it has been cut to prevent contamination from unwanted fungi.
It’s best to use hardwood logs for mushroom growing – oak, beech, birch, hazel, willow etc. Sycamore, apple and ash are not recommended. To support 10-15 dowels, your log should have a diameter of about 10-15cm and a length of 50cm. Keep the logs shaded from direct sunlight and strong winds to prevent them drying out before use. If you don’t have suitable logs for mushroom growing you could ask local tree surgeons, council parks departments or forest managers if they have anything suitable.
- Drill holes about 15cm (6 inches) apart down the length of the log.
- Rows should be spaced 7.5cm (3 inches) apart.
- Insert the dowels and tap them in so they’re flush with the log surface.
- Seal the inoculation holes, any damaged bark and any cut branch-ends with a layer of wax but don’t wax the log-ends as some moisture must be allowed in.
- Position the logs in a shady wooded area or wrap them in black polythene and bury them under ground. You could also place them under evergreen shrubs.
- Keep an eye on your logs and if there are signs of significant cracking soak the logs in water for 2 days to thoroughly wet the bark.
- Mushroom mycelium takes between 6 and 18 months to colonise a log. You may see the mycelium appear as a ‘V’ shape at the end. Once logs are fully colonised they can be moved to a warm, sheltered, moist area in dappled shade where they will begin to fruit.
- Growing mushrooms in woodland is ideal to meet these requirements. Lean the logs with one end on a brick, rock or another log – don’t lie them flat on the ground.
Each species differs and will only fruit when environmental conditions are right. Small, white nodes will appear from the inoculation points on the log and these will develop into mushrooms within a week. Maintain humidity and moisture levels during this time and don’t move the log. To harvest your mushrooms, grasp them at the base of the stem and twist them away from the log. Logs will continue to fruit for up to 4 weeks. After several months the mycelium will regenerate and produce another crop. Logs can be productive for four to six years.
How to grow mushrooms from spawn
Image: Mushroom ‘Brown Cap Button’ (Portabella) from Thompson & Morgan
You can grow mushrooms inside using grain spawn and composted manure. Using this same traditional method, your mushrooms can be grown outdoors, although you’re at the mercy of the weather when you can’t control the conditions yourself.
To grow your mushrooms outdoors, sow the spawn into neglected areas of lawn or around compost heaps between spring and August. Soil rich in organic matter will give the best results.
- Lift 25cm (10 inch) square pieces of turf to a depth of 4cm, with each square set about 60cm (24in) apart.
- Loosen the soil beneath the turf squares with a garden fork, adding extra organic matter such as well-rotted manure or garden compost if the soil is poor.
- Don’t use chemical fertilisers as mushrooms won’t grow in these conditions.
- Spread the mushroom spawn thinly over the soil surface and lightly mix to 1cm deep.
- Replace the turf squares firmly and keep the soil moist, but not waterlogged.
To grow your mushrooms indoors, you’ll need a deep tray or box and an even temperature of around 16C (50F). It shouldn’t fall below 10C or rise above 20C.
- Fill a box with 25cm of compost made from well prepared horse manure. (Use well-rotted manure from a garden centre, or prepare your own.)
- Put your mushroom boxes in a cellar, shed or garden frame. They can be grown in dark or light conditions, but not direct sunlight.
- Remember that mushrooms require an even temperature of around 16C (50F) to grow.
- Tightly pack mushroom beds with prepared compost and scatter the spawn across the surface, mixing it to 2 or 3 inches deep before covering with damp newspaper.
- After 3 weeks, the compost will be colonised by mycelium which will look like white threads. Remove the newspaper at this point and cover the compost with a 2.5cm (1″) layer of casing, mixed from 50% garden soil, 50% peat and a few handfuls of lime. Alternatively you could also use 50% compost (peat-free is fine) and 50% chalk or lime. Lime is necessary as mushrooms prefer alkaline growing conditions.
- Keep the casing layer moist but not wet – use a fine rose watering can or a mister.
- Mushrooms will begin to develop 3 to 5 weeks after adding the casing layer.
- Maintain a moist, humid atmosphere as the mushrooms develop.
- Harvest mushrooms by twisting the cap until it comes away from the compost. You should receive flushes of growth every 10 days or so.
We hope we’ve inspired you to try growing your own mushrooms at home. Whether you choose to colonise a log or grow them in a tray in your cellar, fresh crops of homegrown mushrooms are a fantastic way to add a nutrient-rich boost to family mealtimes. For a selection of different varieties, our ‘gourmet collection’ kit contains 90 dowels of 3 different varieties.